| This article may contain instructional language and subjective recommendations. Readers should read the content carefully, and follow accordingly. |
Don't Starve is a game with simple mechanics. At first, it may seem difficult, but following this guide should keep the player alive for as long as they want to continue playing.
Game Screen[]
The picture below is a labeled game screen with HUD, short for Heads-Up-Display. (note: Sanity/Hunger wrong way around)
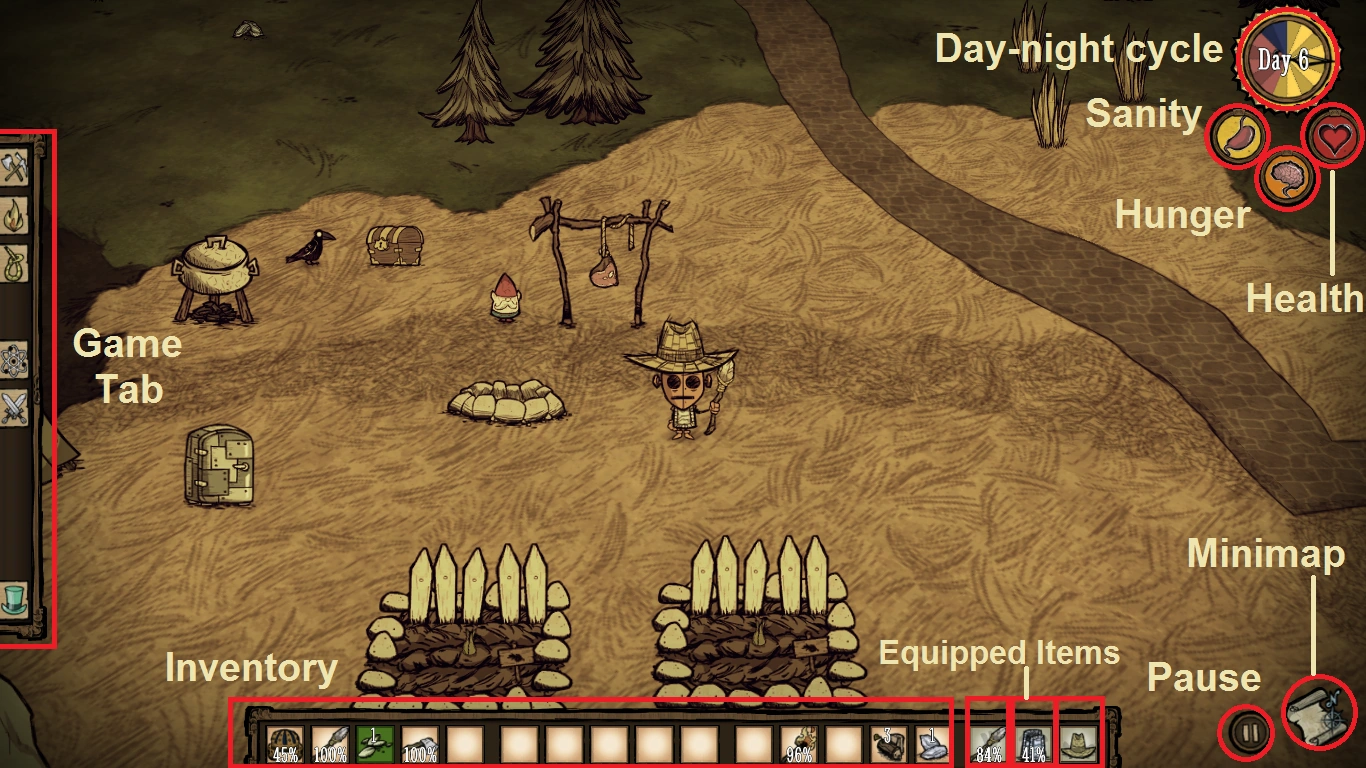
Displays how much damage the player can take. When it reaches 0, it causes the player's Death or Resurrection.
Track how full the player's stomach is. When empty, the player will experience constant health loss (similar to Freezing or Overheating ). This will continue until the player consumes a Food item that refills hunger or dies.
If the player keeps food for too long without eating it, the food item will begin to spoil and rot. The item in the inventory will start as a fresh (Green) item if it can spoil. It will first turn stale (Yellow), then spoil (Red), and finally turn into an inedible pile of Rot which can be used as weak fertilizer for Farms and Plants.
Each stage of spoilage will diminish the positive effects of the food and will eventually add a negative effect to it (i.e., Sanity loss). These effects do not apply to WX-78.
The spoilage rate will double if the food is left on the ground, or it can be cut in half if it is placed in an Ice Box. You can also give it more durability by stacking it with fresher food.
DLCs and DST introduce the Wetness mechanic, causing food to become wet if not protected. Soggy food spoils 30% faster.
This keeps track of the player's current Sanity level. When Sanity drops, numerous things happen based on the current amount. As it falls, the screen will begin to distort and shake, and eyes will soon begin to appear at night (![]() ≤ 60%). The distortion will continue until the Sanity level falls below 50%. Below this, the player can see Shadow Creatures (shadow-like monsters and Beardlings). If their Sanity level drops below 15%, the character will start to hold their head in pain, and the Shadow Creatures will begin to attack the player without provocation (except for Beardlings).
≤ 60%). The distortion will continue until the Sanity level falls below 50%. Below this, the player can see Shadow Creatures (shadow-like monsters and Beardlings). If their Sanity level drops below 15%, the character will start to hold their head in pain, and the Shadow Creatures will begin to attack the player without provocation (except for Beardlings).
Common actions that will reduce a player's Sanity are eating raw Meats and Monster Meat, traveling through Worm Holes, staying in complete darkness, or fighting certain monsters. Actions that will increase the player's Sanity are eating Crock Pot food (like Taffy and Pumpkin Cookies), eating Cooked food, picking Flowers, wearing certain Dress items, sleeping through the night, etc.
On the HUD, a circular object will show the player exactly how much in-game time they will have left before the time of day changes to Dusk, Night, or Day.
The day will slowly turn to Dusk, then Night, and then again back to Day. This cycle will repeat infinitely, but the length of each stage will change depending on the current season (see below).
Summer and Winter are the two seasons in Don't Starve (there are four in the Reign of Giants DLC as well as DST; Autumn and Spring). During these seasons, the amount of Day, Dusk, and Night that will be left in a Day will differ.
Summer does not have much of a change from the game's normal state besides the change in Day times. Winter, however, is drastically different.
During Winter:
- The player is capable of Freezing to death
- The hostile Deerclops boss will occasionally spawn
- The duo of Mactusk N' Son will spawn from Walrus Camps (with 2 Blue Hounds)
Winter is a very hostile season, so it is recommended that the player prepare before it begins. One of the easiest way is hunting a Koalefant before the night starts. When you find it, wait until night and kill it while it's sleeping. You will get a Koalefant Trunk which with 8 Silk can be turned into a Breezy Vest. A Winter Koalefant Trunk can be turned crafted into a Puffy Vest using 8 Silk and 2 Beefalo Wool.
If players are looking at the Clock at night, a small moon phase can be observed. On a full moon, normal Pigs will become Werepigs, which are hostile and dangerous to players. Therefore, it is recommended that players not visit Pig Villages or befriend Pigs on a full moon. If the player's camp resides near a Pig Village or in the center of one, the light produced during the full moon segment can be used to escape from the Village before the Pigs transform. In Reign of Giants, however, many things can happen on a full moon, which can be observed by going into a Deciduous Forest. The first change is that it is bright enough for you to stray from your Campfire without being affected by Sanity loss or Charlie. Additionally, Mushrooms grow into Mushtrees, Flowers turn into Evil Flowers and a unique item, Glommer's Flower, appears near Glommer's Statue.
Equipped Items:
- Body: For wearing Armour, Dress items, Magical apparel, or different types of Backpacks on the torso.
Activated by pressing the Tab key on PC, View button on Xbox One, or the touchpad on PS4.
The Minimap shows the player their location and notable items (Spider Dens, Boulders, Pig King, Fire Pit, etc.) The map fills in when it is explored in the world.
Tabs that are used to Craft different objects (if the player has the correct resources). It also shows what items need to be unlocked and which resources are needed to unlock them.
Pause:
Used to stop the game and choose an option from the HUD (Options, Save & Quit, or Continue.) The shortcut to do this is pressing the Esc key. This can be done on the Pocket Edition version of Don't Starve by pressing the pause button on the bottom right-hand corner.
The method used to unlock craftable items. Players must gather enough resources before unlocking/prototyping an item. A type of Science Machine must be used for prototyping. Prototyping will increase your sanity a little.
If players have any inquiry, please feel free to read articles in the gameplay mechanics bar below or make comment below the page, editors will reply to your question.
Day 1[]
The player does not start with any items, aside from some character-specific items. The first major concerns for players are Hunger, Night, And Sanity
During daytime[]
- Pick up Flint and Twigs for crafting a Pickaxe and an Axe in the
 tab.
tab. - Collect Cut Grass from Grass Tufts and chop Trees for Logs. They will be used for crafting a Campfire at night.
- Collect Carrots and Berries to cook over the Campfire in the evening.
- Continue with this until through the day and most of the Dusk. Then you have two options:
- Option 1: Find a place to settle down and then build a Campfire in the tab. Make sure to keep your fire burning throughout the night by adding occasional logs to it. A Campfire is the best option if you want to chop down trees, mine rocks and cook food during the night (if you want to conserve fuel, cook food later when the fire has gotten smaller). A well-stocked fire will prevent Charlie from murdering you in the dark. When it's not raining, the Campfire will provide just enough light to last through the night although a log or two should be added if you want to light surrounding areas. Stay as close to the fire as possible to prevent loss of Sanity.
- Option 2: Make sure you have materials for at least a couple of Torches which must be equipped just when the night arrives. A Torch allows continued exploration and resource gathering during nighttime. Contrast to what it may seem, nights aren't that much more dangerous apart from darkness. If you keep away from the Marsh biome, the only enemies that you might worry about are Spiders that can be easily avoided. During the night you should also try to eat your cooked food, you will need the day and dusk to gather resources
Try this strategy:
- Gather everything in sight. You will need 12 Flowers to construct a Garland to keep your Sanity up (WAIT until Day 4 or 5 to start gathering flowers when your Sanity goes down, picking a flower gives 5 sanity which is good for quick sanity recovery. It is recommended to pick just enough for your sanity needs as flowers once picked take a few days to re-spawn). You will also need lots of Cut Grass, Twigs, and food such as Carrots and Berries.
- When Night comes, build a Campfire near big trees to efficiently spend nighttime chopping trees. Alternatively, you can craft Torches and burn the trees, being careful not to pick dense tree areas, for they will all catch on fire. Pick a lone tree with a 2x2 range from the next tree. Burn tree after tree until sunrise. Use an Axe to cut down the burnt trees and collect Charcoal. Try to get at least six Charcoal in the first night.
Don'ts[]
- DON'T attack Spiders or Spider Dens. Attacking a den will aggro all spiders in the den (3-9, depending on the size of the nest). It will be very dangerous for beginners if they are not well-equipped.
- DON'T attack Bees or Bee Hives. Attacking the hive will cause surrounding bees to become angry. Also, Killer Bees will spawn and attack Characters proactively.
- DON'T attack a Tallbird or take their Tallbird Egg. They cause great damage to players' Health and they will chase players for long distances.
- DON'T attack Beefalo, as they are useful for producing infinite Manure.
- DON'T travel through the Marsh; dangerous Tentacles, Merms, and Mosquitoes may easily kill beginners.
And most importantly:
- DON'T STARVE!
Note: Only attack these monsters if players are well-equipped to fight them, for example, having a Log Suit, a Spear and a Football Helmet. Also, prepare enough food (Berries, etc.) and/or healing items.
The Marsh is a dangerous place, but you will need the Reeds that grow there. Avoid Tentacles that can be seen hiding in the ground as you approach them. Be very careful! The Marsh is the most dangerous area in the early-game.
Do's[]
- DO collect lots of Pine Cones, it is useful to avoid traveling far for Logs, and to tame Treeguards.
- DO start building a base near Beefalo or Pigs, they are some of the only sources of Manure. Beware that Beefalo may attack players when they are in mating season, and that Pigs will turn into Werepigs on a full moon. Players may have to acquire a Beefalo Hat in advance, either from crafting or by finding one in a Set Piece.
- DO try to attack Birds. Although they may not be killed, they leave Seeds behind which can be planted in Farms. It is possible to kill Birds using Seeds to lure them and a Weapon.
Day 2-7[]
Similar to Day 1. However, players are recommended to do the following things:
- Continue to explore as much as possible to find key resources.
- Open up crafting options, like finding sources of Gold Nuggets for Science items like the Science Machine, and Manure to open up Farming.
More Tips[]
- At night, when you can't find a good base around the early days (Day 2+), make a Torch and continue exploring. The more you expand your Map, the better of an idea on where you want to set a Fire Pit. It is best to follow Roads with a Torch while constantly checking the Map to avoid hostile Monsters like Spiders. Materials for a Campfire can be helpful, should your Torch run low.
- Create a Pickaxe in the tab. Mine Boulders for Gold Nuggets, and create a Science Machine in the tab.
- Prototype Rope in the tab for crafting the Log Suit and Spear in the tab. These will help you survive against Hounds and bosses.
- Explore for an area that has Beefalo (Savanna), because lots of Manure can be found and they are important to build Farms, as well as being usable for fertilizing crops.
- When the Hounds appear, to avoid taking damage, try to find a nearby Beefalo herd, not in mating season, and avoid getting hit.
- Avoid the more dangerous enemies (Tentacles, Spider Warriors, etc.) until the player has created a Life Giving Amulet or a Meat Effigy or found a Touch Stone.
- Whenever you're fighting enemies, keep an eye on Spear and Armor durability.
- If exploring, don't forget to return and replace any checkable Traps.
- Heal Characters by killing Butterflies and eating the dropped Butterfly Wings, eating Roasted Berries, or killing Spiders for Spider Glands (a single spider can easily be stun-locked to death with 3 hits of the spear).
- Explore as much as possible before setting camp. A great camping spot should be centered around a good list of the following: Touch Stone, Pigs/Beefalo, a Savannah with lots of Grass/Rabbit Holes, a Worm Hole, loads of Boulders and Trees. Priorities such as Beehives, Marsh, Caves, Things, Walrus Camps and Tallbird Nests should be left alone until the later days when you don't have to worry about Health, Hunger, Sanity and basic materials.
- Players may befriend Pigs by giving them any Meats or Eggs. Once befriended, they can help chop down trees and fight against Monsters. They might be very helpful to beginners, but players must remember that Pigs will turn into Werepigs during a full moon.
- Try to find the Pig King and a Beefalo herd as soon as possible. The Pig King will give you Gold Nuggets in exchange for Meats, Eggs and Trinkets. However, don't build too close to the Pig King, as the Pigs can turn into Werepigs.
- Build your base close to a Beefalo herd, but be at least 1 biome away as Beefalo in heat will attack you.
Meanwhile, players are not recommended to consume Monster Meat (unless playing as Webber), and instead save it to feed Pigs (especially if you want to fight Werepigs for collecting more loot); otherwise just let it turn into Rot as fertilizer for Farming or use it in a Crock Pot to get rid of the negative effects.
Day 7+[]
Once a suitable location is found,
- Set up a base with a Fire Pit (a permanent structure)
- Set up a Science Machine for prototyping useful Items
The Fire Pit is much better than the regular Campfire because players can see it on the map and if it goes out, players can restart it with fuel. Also, players may build infinite food supplies like:
- Building Farms for planting Seeds in the tab.
- Building Crock Pot for making better food in the tab.
- Collecting Berry Bushes, Saplings and Grass Tufts with a Shovel in the tab.
However, players should be aware of lightning, as it may burn Berry Bushes, Grass Tufts and other plants. Players may build a Lightning Rod to prevent wildfires. At the same time, continue to set traps for Rabbits and collect Seeds and Manure for farm plots. Any Beehives encountered need to be destroyed and rebuilt as Bee Boxes. Players may need a Beekeeper Hat in advance. Note that players need to capture Butterflies by using Bug Net, then plant them as Flower nearby Bee Boxes. The Bees can only produce Honey after pollinating 8 Flowers.
Players may continue to mine or look for the Pig King, and exchange Meat for Gold Nuggets to use for more efficient tools. De-construct some Pig Houses with the Hammer. Continue to explore the map and bring back any resources found, be sure to immorally dig up any Grave you find as you may obtain a Life Giving Amulet, but keep an eye on your Sanity. With all of the traps, food should not be an issue and with Bee Boxes you should be able to avoid dying.
Since Hounds are more likely to appear during this time, players may want to create a Log Suit and a Spear. With these items, players are able to kill Monsters easily and take loot from them.
Around day 16, players may create a Meat Effigy in the ![]() tab (but players will lose 30 from their maximum Health for each Meat Effigy built):
tab (but players will lose 30 from their maximum Health for each Meat Effigy built):
- For Wilson - shave your Beard
- For other Characters - get yourself to under 40% and kill Beardlings for Beard Hair
If available, always bring a Life Giving Amulet with you. Be sure to wear it when in real danger, as simply having it in the inventory will not resurrect the player. However, the Meat Effigy will automatically resurrect the player on death when created.